Saturday, January 29, 2011

Turning Prefold Diapers into Contours


When I first decided to use cloth diapers, I had no idea so many options existed. I really only was familiar with prefold diapers with plastic pants, which is what I purchased and have been very happy with. It is definitely the most economical way to cloth diaper.
Since I had been given so many disposable diapers as gifts, I didn't begin cloth diapers with Benjamin until he was over a month old (and quite a bit bigger than a newborn!). With Joanna, however, I used cloth diapers from the time she was about a week old. While I love my one-size prefold diapers, I did find them to be a bit bulky on such a small baby. I intend to use cloth diapers from birth (or at least after the first week) with this next baby, but I came up with an idea that might make the first several weeks a little easier.
I have a number of cloth diapers that I was given that I find to not work as well, as they are not as absorbant as my main supply. I've been keeping them for back up when I'm behind on laundry and run out of my others! But I think they would work just fine on a newborn. So I had the idea to cut them down into contoured diapers, which would reduce the bulk, expecially between the legs on a tiny baby. Contoured diapers are "shaped" to fit your baby better, with little need for folding to fit (think of the shape of disposable diapers).
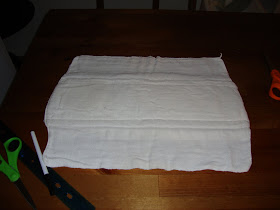

It was super simple to do. I started out with a diaper, and, using pictures from the internet to give me a general idea, cut out a contoured shape. I did it freehand, cutting out half the diaper first, then folding it over and cutting out the rest, so it was symmetrical. I just guessed on how big it needed to be. I made mine about 13 inches long, with the back tabs about 12 inches wide, and the crotch area about 5 inches wide. Later I found measurements for a commercial contoured diaper, and their newborn size was 12 1/2 inches long and 4 1/2 inches at the crotch, and they expected you to have to fold it down a bit in the beginning. I probably will have to fold down the front a bit, but that's okay. It should still fulfill my goal of cutting down on the bulk.


After cutting out the first diaper, I made some adjustments when I cut out the second, making it slightly better shaped, then I used that second diaper as my pattern to cut out the rest. I just winged it, but if you're not comfortable doing that, you could make a paper pattern first. After cutting out the diapers, I sewed a straight stitch all the way around the diaper, about 1/4 inch away from the edge, just to hold all the raw edges together and give it strength. Then I finished the edges by serging, but you could also use a zig zag stitch on a sewing machine. If you use a zig zag stitch, I would recommend going around the diaper twice. That's it!


I ended up with 16 contoured diapers, which should last me almost two days. I'm really excited to try them out, and I think they will make cloth diapering a newborn much easier! I'll let you know how it goes in several months!

Saturday, January 22, 2011

Pizza Kit

I said I would post more details on the little pizza kits I made for Christmas, so here it is!

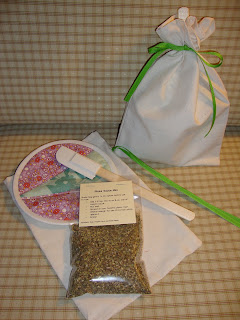
Each kit was wrapped in a simple tie-top muslin bag and included a mini spatula, a hot pad, and a pizza sauce mix. This made a nice lightweight gift that I could mail to the relatives that I have no idea what they would like or use! The hot pad was made from a pattern in Handmade Home by Amanda Blake Soule, and was quick to make and inexpensive because it only needs scraps of fabric. I made one for myself as well, and it is now my favorite hot pad - it is the perfect size, the rounded shape means no corners poking into your food, and it is so cute!


The pizza sauce mix was also quick and frugal! By buying spices in the bulk department, each sauce mix was probably only about $1 (or less) to make. I used the recipe in the Tightwad Gazette, which is as follows:

1 tsp. basil
1 tsp. oregano
1/4 tsp. garlic powder
1/8 tsp. black pepper
These spices are to be mixed with an 8-oz can of tomato sauce, and it makes our favorite pizza sauce. The recipe states it fits a 12-14" pizza, but I must use light sauce, because I have found it to go probably twice as far as that.

I was able to find nice ziploc bags in the bead section at Michael's in the 4"x6" size, which was perfect for holding the mix! (These can also be found online)

I multiplied the recipe by 12 - here it is to make it easier:
1/4 cup basil
1/4 cup oregano
1 Tbsp garlic powder
1 1/2 tsp. black pepper

I mixed these together in a bowl, then scooped it into the bag. Then I stapled a little instruction card to the bag.


A tip: With the garlic powder, try to find one that is more of a granule than a powder. I have found that powders tend to get hard, and I used a powder in my test batch of sauce mix, and the mix got hard in the jar. It tasted fine, but it doesn't look as nice when you have to break up the spices! I find that the granules don't tend to harden together.

This made such a simple but useful gift, and I have found the pizza sauce mix a very handy thing to keep around my home as well! I can whip up some fresh pizza sauce in no time at all!

Wednesday, January 19, 2011

Oven Roasted Veggies

A couple of weeks ago, I noticed some root vegetables (turnips, parsnips, and rutabegas) on sale, and since I didn't think I had ever had any of them, I thought I'd be adventurous and give them a try! I didn't know what to do with them though, other than perhaps add them to soup. Then I remembered the oven roasted potatoes my mom used to make, and wondered if I could cook them up in a similar manner. Well, I tried it, and it was delicious! The combination of flavors from all the different vegetables was really good and it was the perfect compliment to our chicken dinner.

Here's the recipe, adapted from my mom's roasted potato recipe:

2 parsnips
2 turnips
3 medium carrots
2 potatoes
1/4 cup coconut oil (or butter or olive oil)
Salt
Pepper
Garlic powder
Parsley

Peel all veggies and cut up into bite-sized pieces (I did leave the skin on the potatoes, which adds extra color and extra nutrition - I try to buy organic potatoes for this reason). Spread veggies in a 9x13 pan.

Melt coconut oil and pour over veggies. Stir veggies to coat with oil. Sprinkle veggies with salt, pepper, garlic powder, and parsley and stir again.

Bake at 375 degrees for 40-50 minutes, or until veggies are soft and beginning to crisp on the outside.

This should serve 4-6 people. Enjoy!

Thursday, January 13, 2011

A little couch project...

I was thinking earlier that our couch looked a little, well, boring.

I'm by no means any sort of interior decorator, but it seemed to me that it needed a little color. So I gave it a some thought, raided my fabric stash, and came up with a solution.


Remember that plain white-looking pillow? It got a little updating. Some fabric and a pillow I already had + a couple of hours of time = a free fun new look! I'm loving it!

Sunday, January 9, 2011

2011

I can't believe it's a brand new year! As I think ahead to this year, one word comes to mind - change. Lots of new things will be taking place in our family this year.
The first major change I'm excited about is my new daily schedule. I've made myself schedules before, but never stuck with them very well. But lately I've felt like I've been rushing through my days with no idea what I'm really doing, and always feeling like I'm five steps behind. I want to have goals for my days and a plan for how to accomplish those goals. I'm trying to make myself a realistic, flexible schedule with plenty of extra time built in for those inevitable interruptions that always occur when you have little kids! My goal is to stick to it, making changes as necessary. We'll see how it goes!
Another major change is that I'll soon be potty-training Benjamin, which is exciting, but also a little daunting for me! Not only is it a big step for him (and me), but it will also probably mean that we'll be staying home a lot more, since I am not really up to taking little kids into a public restroom!
A major family change is coming around the beginning of June, as we look forward to welcoming a new little family member around that time! Summer will be a busy time for us, as I get used to having three kids under the age of three! =)
Sometime this year, Lord willing, we will also be moving. We're just not sure yet if it will be just across town or even possibly out of state, if Seth gets accepted to one of the graduate programs he's applying to. That would be a huge change, especially since both Seth and I have spent our entire lives within about a 30-mile radius (or maybe less)!

This will be a busy year for us, but we're looking forward to the exciting changes coming our way!

Christmas Creations

I figured I could show my Christmas projects now! Or, at least the ones I actually remembered to take pictures of!

Pizza Kit (I'll share details on this soon!)

Potholders, towel, and dish cloth for the kids' play kitchen!
Bread Bag
Gathered Clutch (using this tutorial - I just have to say, I am not a clutch person, but this turned out so cute that it made me want one, too!)
Laptop Case (using this tutorial, with a few of my own alterations)
Slippers (the red ones are from a pattern in Sew Pretty Homestyle, and the blue ones are from this tutorial)
Fleece Blanket

There were more projects, as it is my goal that at least part of everyone's present is homemade, but that's it for the pictures!