Friday, March 18, 2011

Mini Bathroom Makeover!

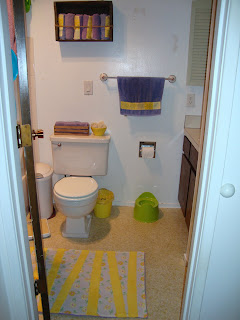
I've been wanting to do something different with my bathroom decorating for a while. It was just boring and not very attractive. I really wanted to make it a bit more old-fashioned and homey looking. A couple of months ago I replaced a glass shelf I didn't like with this antique crate, which I'm using to hold hand towels, and I love it!


I really wanted to change the purple and blue color scheme, but I couldn't justify buying new towels, since these ones are still perfectly good. I finally thought of adding in more yellow, which is a cheerful color, but it also goes well with purple and blue. I had originally planned to add a few yellow touches to my purple and blue bathroom, but hadn't gotten beyond the yellow garbage can. So now was my chance! I got a couple of pieces of yellow fabric, and along with some I already had, I made some patchwork strips that I sewed on to one side of each of my hand towels.


I picked up a couple of cute yellow bowls with a gift card, and they hold some toiletries.


I also made a new rug, using the design from Handmade Home, by Amanda Soule.


I love how everything turned out! The bathroom looks much more cheerful and welcoming, and since I mostly just updated the things I already had, I only spent around $12, for the fabric and rug materials.

Friday, March 11, 2011

Pillowcase to PJs

As much as I love cozy one-piece pajamas on little kids, they're not really the most convenient for potty-training two-year-olds. However, I didn't have much luck trying to find a second pair of pajama pants for Benjamin. My solution, as it often is, was to make them myself, especially since pants are super easy. Made even easier by a discovery I made when trying to think of some ways to use a worn-out flannel sheet set I no longer needed. A pillowcase is the perfect size for size 3 toddler pajama pants. I used the pillowcase hem for the hem of the pants, which meant less sewing. There's no need for a pattern - just use a pair of pants that fits well for your template.


Fold pants in half. Fold pillowcase in half. Lay pants on pillowcase, with outside of the pant legs lined up with the pillowcase fold. Line the bottom of the pants up with the hem of the pillowcase.


Cut out, adding about 1/2 inch seam allowance, and about 2 inches at the top for a casing. Make sure to stretch out the waistband and cut around the stretched out size, so you make sure the waist is big enough.


Put the two pieces right sides together and sew the front and back seams (the curved part). Serge/finish edges as desired.


Open it up and put the pant legs together, right sides together, lining up the front and back seams and sew in one long seam. Finish edges as desired.


Press down about 1/2 inch on top edge, then again about 1 1/4 inches. Sew casing close to the inside folded edge, leaving a 2-inch opening. Insert 1" wide elastic, as needed for comfortable fit, sew elastic edges together and sew opening closed.


Be cozy!

Recent Kitchen Projects!

I've been trying some new recipes and projects around here recently:

I've been wanting to try homemade bagels for quite some time, and several weeks ago I finally got around to trying it! I tried the recipe from How to Cook Everything by Mark Bittman. They were really quite simple and turned out delicious! I've made them several times since, although I now make them with half whole wheat flour, to make them healthier. I usually make half of them with cinnamon and raisins, which are especially good!

I enjoy making fruit & yogurt smoothies for part of an easy breakfast or lunch, and the other day we decided to try making them with spinach for extra nutrition. I was a little leary of how good they would be, but was pleasantly surprised when we couldn't taste the spinach! This is a great way to get an extra serving of veggies, even for breakfast!

Seth was out recently and he had a delicious smoothie that was made with almond milk, and he thought that we should try making our own almond milk to add to smoothies. We tried this recipe, which was really easy. I didn't have dates or plain agave, so I used two tablespoons of the Maple/Agave syrup blend I had (I used less since it's fairly sweet). It tasted pretty good, although it seemed slightly watery. Some recipes we saw said to use three cups of water instead of four, so if I were making it to drink plain, I would probably try that. It has worked really well for the smoothies we've made and adds a nice flavor. I'm hoping to add the almond meal that was left over to some cookies or something, just so it doesn't go to waste!


Not a very exciting project, but one that will come in pretty handy is my bags of chopped onions that I put in the freezer. So many recipes I make call for chopped onion, so having lots of onion already chopped up for me to just grab and dump in will help simplify meal making for me!


And last but not least, my homemade vanilla has been sitting for about a month now, with five more to go. I'm excited to see how it turns out!

Sunday, March 6, 2011

Joanna's Birthday

My little lady turned a year old a couple of weeks ago...


Such a big girl...


Unlike Benjamin, who wouldn't touch ice cream on his birthday, or for months afterwards, she loves it! =)

No-Sew Play/Dancing Scarves


I love giving the kids open-ended materials that allow them to be creative and use in a variety of ways. One such item is play cloths or dancing scarves. These are usually pieces of lightweight, floaty fabric that are fun to dance with, can be used to make costumes, or in endless other ways. Buying these, however, isn't always cheap, up to $13 each for really nice ones, which wasn't really in my budget. They can be found cheaper, but I came up with a very simple, very inexpensive alternative.


I purchased a very fine nylon net, for less than a dollar a yard on sale. The finer the net, the more soft and floaty it will be. I purchased a yard of each color that I needed, and cut a 36" square from each (the size of some commercial ones I saw). You really can make them any size you want, but making them larger like this allows for more options in play. Nylon net doesn't unravel, so there's no need to hem or finish the edges. Just cut it the size you want, and you're good to go! These might not be quite as vibrant or soft as the $13 ones, but they're still plenty of fun to play with - and the price was much easier on my pocketbook!


Not only did this make inexpensive play clothes, there was just enough leftover net to make two (colorful) kitchen scrubbers!